The demand for typing skills is immensely growing due to rich technological involvement in every field of modern life ( business, education, programming, and writing, like journaling, blogging, etc.) And most institutions find their work more convenient online. For example, Exams take place online, where typing is mandatory to perform better.
Table of Contents
#1: Basics of typing and keyboard:
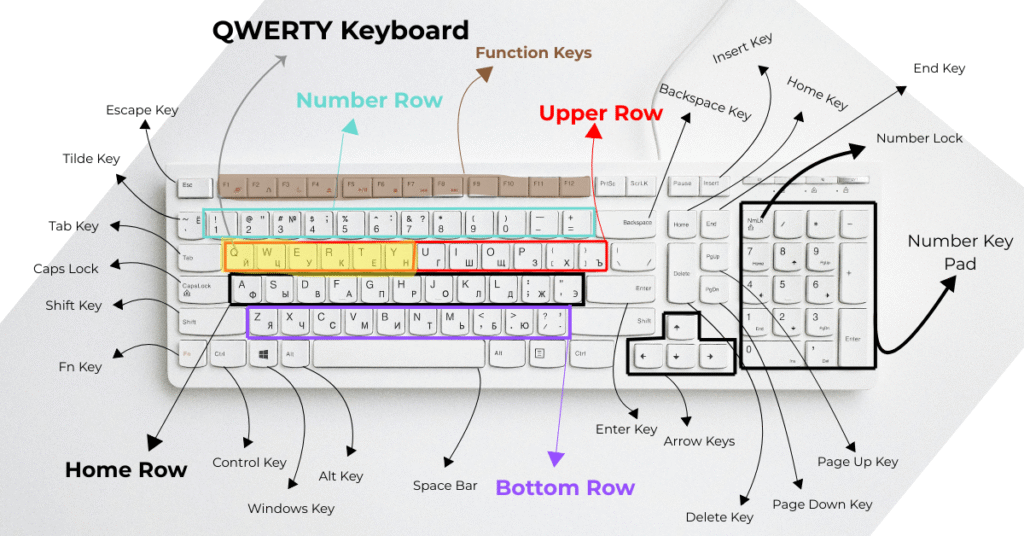
*QWERTY Keyboard Layout: There are many types of keyboards in the market, but the most prominent is the QWERTY layout keyboard, which was first introduced by Christopher Latham Sholes in 1870, also known as the inventor of this keyboard.
Row: Row means something that lines horizontally, and Column that lines vertically. This keyboard has six lines horizontally, from top to bottom, named as follows: Function Keys, Number Row, Upper Row, Home Row, Bottom Row, and Spacebar Row.
- Function Keys row: the functional keys row is located at the top and first line of a keyboard, presented with keys escape key, F1, F2, F3, F4, F5, F6, F7, F8, F9, F10, F11, F12, insert key, delete key. They have multi-dimensional use depending on the operating system and software. Such as, my laptop dedicated these keys for its own functioning like f1 for sound muting, f2 for unmute sound, f3 for increasing sound volume, etc. And specific software, like Chrome, Microsoft Word, and Excel, each uses different functions for these keys.
- Number Row: A number Row is a combination of keys from right to left, numbers and characters located under the function keys row. Often used for mathematical equations and various uses of characters depending on context.
- (1-0) 10 number keys
- Characters signs: ` or ~ ! @ # $ % ^ & * ( ) — + – =
- Upper Row: This row is positioned under the Number Row and consists of letters and tab key QWERTYUIOP{}| and QWERTYUIOP[]\ in order. And the Upper Row is the most used row after the home row.
- Home Row: Home Row is located under the Upper Row, which is the main row from where your typing will be distributed. This row is designed with keys and letters Caps lock ASDFGHJKL:” Enter key and asdfghjkl;’\
- Bottom Row: Bottom Row stays under Home Row with letters and keys: Shift key ZXCVBNM<>? Shift key and zxcvbnm,./
- Spacebar Row: Spacebar row is the last line of the keyboard combination of several modifier keys, such as Ctrl, Alt, fn, Windows key, etc.
Lesson 1: Home Row
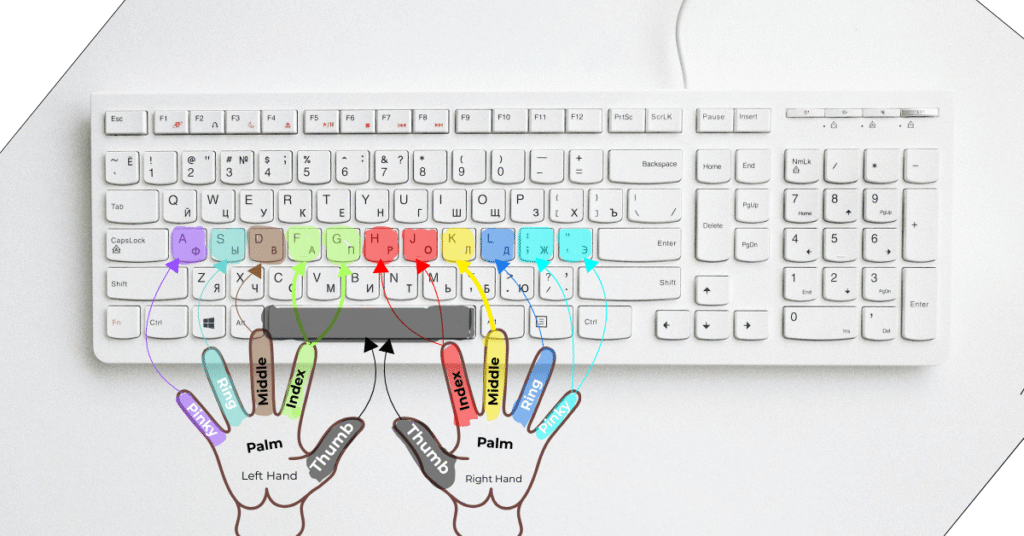
Positioning your both hand on the home row :
- Position your left hand’s fingers step by step: pinky finger on the letter A, followed by your Ring finger on S, then middle finger on D, Index finger on F.
- For the right hand, position your pinky finger on the Semi colon, Ring finger on the L, middle finger on K, and Index finger on J.
- Thumb finger positioning depends on the righty and lefty. If your dominant hand is right then position your Right hand Thumb on the spacebar key Or if it is left hand, then position your left Thumb on the spacebar key.
- Now, rest your palm’s bottom part on the table with this holding position of the home row’s keys I’ve instructed.
Start learning and practicing Home row keys:
Left hand:
- Tap the Letter A with your left hand’s pinky finger, and after that, tap the spacebar key immediately with your Thumb. Then, stop for a second.
- Next, tap the letter S with your left hand’s Ring finger, + Tap the spacebar.
- Tap the letter D with your left hand’s Middle finger, + Tap the Spacebar.
- Tap the letter F with your left hand’s Index finger, + Tap the Spacebar.
- Tap the letter G with your left hand’s index finger, and return your index finger to the previous position on the F key, + Tap the Spacebar key.
Note: Both hands should be positioned on their specific keys or places. You have to stick your fingers in their place while typing keys, such as when you type letter A, other fingers should be stuck in their position, no big movement. Furthermore, at the beginning, you can type while looking at the keyboard, but over time, you have to type without looking at the keyboard.
Right Hand:
- Tap the Semicolon ; with your Right hand’s pinky finger, + Tap the Spacebar.
- Tap the letter L with your Right hand’s Ring finger, + Tap the Spacebar.
- Tap the letter K with your Right hand’s Middle finger, + Tap the Spacebar.
- Tap the letter J with your Right hand’s Index finger, + Tap the Spacebar.
- Tap the letter H with your Right hand’s index finger, and return your index finger into the previous position on J key, + Tap the Spacebar key.
Practice:
- Repeat the instructions I’ve given you as much as possible. Such as, a s d f g ; l l k j h including space. First type with looking at the keyboard, later try without looking at it.
- Follow the Pomodoro technique: 25 minutes typing and 5 minutes rest. Or follow your own technique based on your comfort.
- Type slowly and attentively.
- Pronounce the key you are typing with a loud voice so that it is memorized in your brain.
- Practice these words: add; all; ash; abs; am; ask; salad; slap; sad; dad; dag; gas; has; had; half, hall; fall; gall; god; lad; jal; jag;
Lesson 2: Upper Row
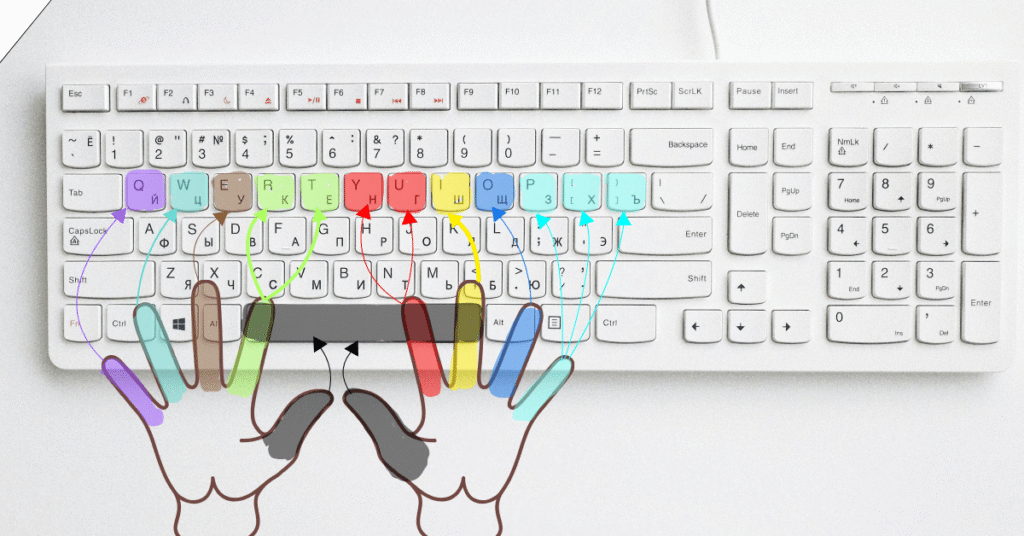
Hand Positioning:
- Settle your both hands on the home row based on previous instructions.
- First left hand positioning, then right hand.
- Putting both hands on the home row is the base and fundamental.
Start learning and practicing Upper row:
Left hand:
- Shift your left hand’s pinky finger from letter A to Q. Tap the letter Q on the upper row and then come back to the previous position A key. Then type the spacebar key.
- Next, shift your left hand’s Ring finger from letter S to W and type the letter W on the upper row, and then return your ring finger to the previous position S key on the home row. Then type the spacebar key.
- Shift your left hand’s Middle finger from letter D to E and type the letter E on the upper row, and then return your middle finger to the previous position D key on the home row. Then type the spacebar key.
- Shift your left hand’s Index finger from letter F to R and type the letter R on the upper row, and then return your middle finger to the previous position R key on the home row. Then type the spacebar key.
- Shift your left hand’s Index finger from letter F to T and type the letter T on the upper row, and then return your Index finger to the previous position F key on the home row. Then type the spacebar key.
Right hand:
- Shift your Right hand’s pinky finger from semicolon ; to P and tap the letter P on the upper row, and then come back to the previous position ; key. Then type the spacebar key.
- Additional: Shift your Right hand’s pinky finger from semicolon ; to [ and Tap the [ on the upper row and then come back to the previous position : key. Then type the spacebar key.
- Additional: Shift your Right hand’s pinky finger from semicolon ; to ] and Tap the ] key on the upper row and then come back to the previous position ; key. Then type the spacebar key.
- Shift your Right hand’s Ring finger from letter L to O and type the letter O on the upper row, and then return your Ring finger to the previous position L key on the home row. Then type the spacebar key.
- Shift your Right hand’s Middle finger from letter K to I and type the letter K on the upper row, and then return your middle finger to the previous position K key on the home row. Then type the spacebar key.
- Shift your Right hand’s Index finger from letter J to U and type the letter U on the upper row, and then return your Index finger to the previous position J key on the home row. Then type the spacebar key.
- Shift your left hand’s Index finger from letter J to Y and type the letter Y on the upper row and then return your Index finger to the previous position Y key on the home row. Then type the spacebar key.
Practice:
- Repeat this pattern for 101 times.
- Practice slowly, watchfully, and attentively.
- Pronounce loudly while typing.
Practice words: Quote, Quit, were, wet, we, eerie, eye, roy, rip, rope, tow, tree, tip, toy, top, you, up, it, io, oops, prior, poor, put.
Lesson 3: Bottom Row
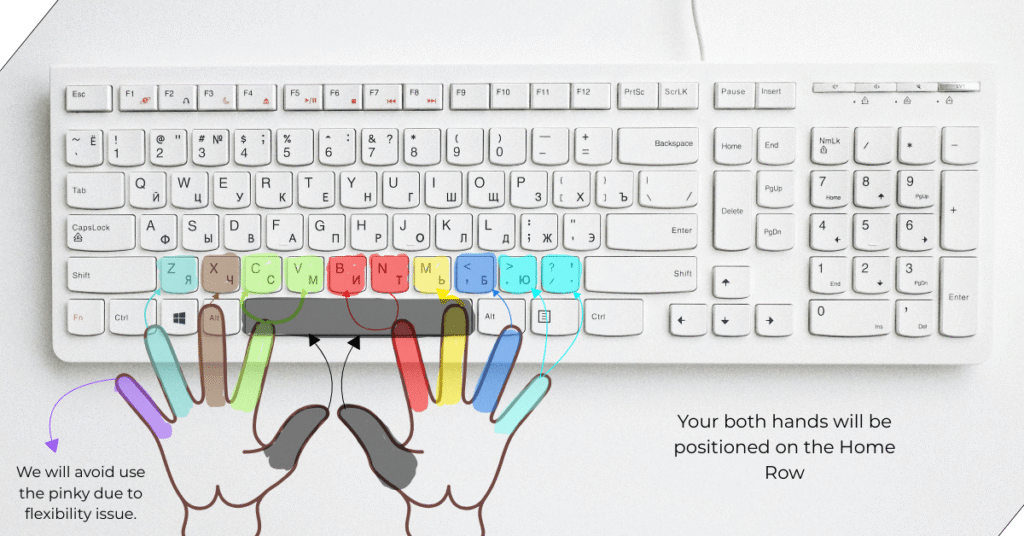
Hand Positioning:
- Position your both hands on the home row again.
- First left hand positioning, then right hand.
- Putting both hands on the home row is the base and fundamental.
Start learning and practicing Bottom Row:
Left hand:
- We’ll avoid the left hand’s pinky finger due to the shortness of the bottom row’s keys, which will be awkward and not flexible to use frequently.
- Move your left hand’s Ring finger, which is positioned in the home row’s letter S to Z, and type the letter Z on the bottom row, and return your ring finger to its previous position S on the home row. Then, type the spacebar key.
- Move your left hand’s Middle finger from D to X and return it to its previous position, then type the spacebar key.
- Move your left hand’s Index finger from F to C and return it to its previous position, then type the spacebar key.
- Move your left hand’s Index finger from F to V and return it to its previous position, then type the spacebar key.
Right hand:
- For the right hand, we will definitely use the pinky finger. Move your Pinky finger ; to . and return to the previous position ; key. Then, type the spacebar key.
- Move your Pinky finger ; to / and return to the previous position ; key. Then, type the spacebar key.
- Move your Ring finger L to Comma , and return your ring finger to the previous position L. Then, type the spacebar key.
- Move your Middle finger K to M and return your finger to the previous position K. Then, type the spacebar key.
- Move your Index finger J to N and return to the previous position J key. Then, type the spacebar key.
- Move your Index finger J to B and return to the previous position J key. Then, type the spacebar key.
Practice:
- Repeat this bottom row pattern for 101 times.
- Do it slowly, and progressively.
Lesson 4: Number Row
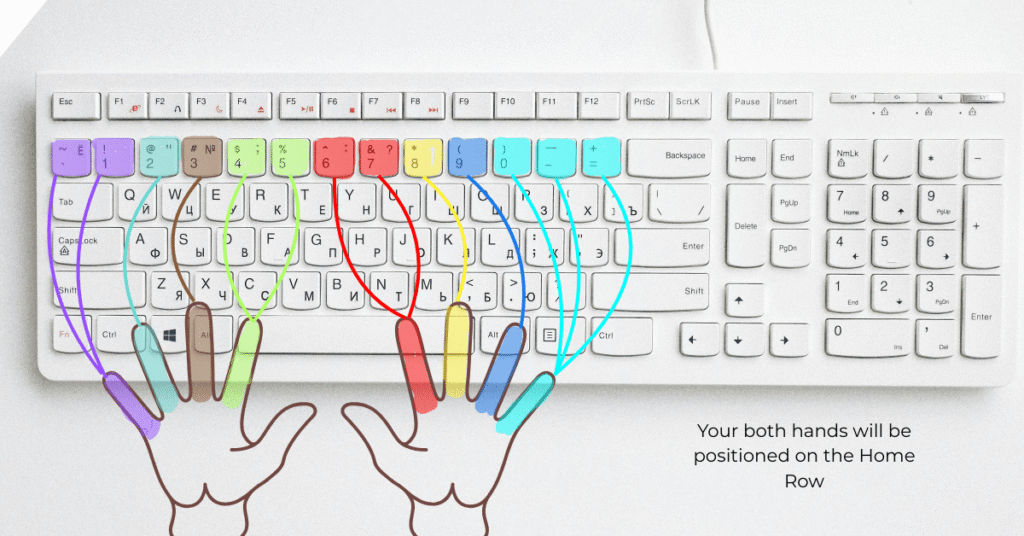
Hand positioning:
- Position your both hands on the home row again.
- First left hand positioning, then right hand.
- You have to keep in mind that putting both hands on the home row is the base and fundamental.
Start learning and practicing Number Row:
Left hand:
- Push your left hand’s pinky finger to the top row/number row letter A to 1 and return it again to previous position A. Then, type the spacebar key.
- Shift your left hand’s Ring finger from S to 2 and return to the previous position again. Then type the spacebar key.
- Shift your left hand’s Middle finger from D to 3 and return to the previous position again. Then type the spacebar key.
- Shift your left hand’s Index finger from F to 4 and return to the previous position again. Then type the spacebar key.
- Shift your left hand’s Index finger from S to 5 and return to the previous position again. Then type the spacebar key.
Right hand:
- Shift your right hand’s Pinky finger from ; to 0 and return to the previous position again. Then type the spacebar key.
- Additional: Shift your left hand’s pinky finger from ; to – and return to the previous position again. Then type the spacebar key.
- Additional: Shift your left hand’s Pinky finger from ; to = and return to the previous position again. Then type the spacebar key.
- Shift your right hand’s Ring finger from L to 9 and return to the previous position again. Then type the spacebar key.
- Shift your right hand’s middle finger from K to 8 and return to the previous position again. Then type the spacebar key.
- Shift your right hand’s Index finger from J to 7 and return to the previous position again. Then type the spacebar key.
- Shift your right hand’s Index finger from J to 6 and return to the previous position again. Then type the spacebar key.
Practice:
- Repeat this bottom row pattern for 101 times.
- Do it slowly, and progressively.
- Practice these numbers below: 10, 12, 21, 22, 31, 33, 41, 44, 51,55, 61,66, 71, 77, 81, 88, 91, 99, 01, 100.
Lesson 5: Use of Keys
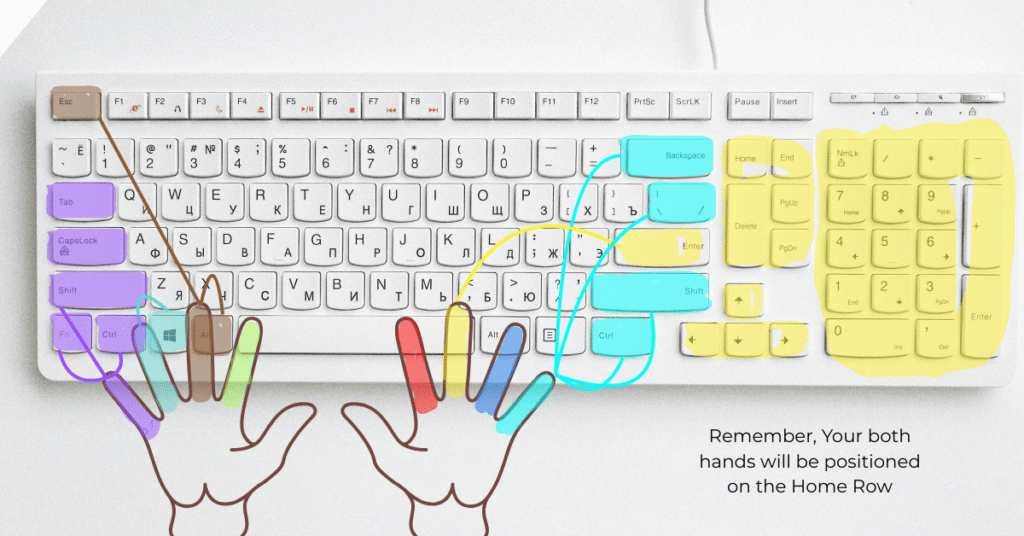
*Use of the shift keys:
- Pressing and holding the Shift key will access the Capital letters and Alternatives of all the keys such as type the letter a is normal and its alternative use is A.
- The keyboard has two shift keys, one on the left side and the other one on the right side.
- For the left side’s key, hold the shift key that is located on the right side.
- For the Right side’s key, hold the shift key that is located on the left side.
*Use of the Control keys:
- Ctrl or control key doesn’t work alone, it works jointly with other keys to function differently in softwares, operating systems, and internet browsing. Especially, for efficient and rapid commanding. For example, Ctrl + C : copying text and objects. Ctrl + V : pasting the copied text or objects. etc.+ C: Copies selected text or objects
*Use of the Alt keys:
- Alt or Alternate key is the modifier key that works with a combination of other keys to perform various functions and shortcuts.
*Use of the Windows Keys:
- Windows key is basically used for opening the windows search tab or menu and it can also be used for short-cuts of different windows functions by holding windows key with other vital keys.
*Use of the Caps lock:
- Caps lock is a key that requires to be activated while you need to type a long sequence of Capital letters. You will see a light appear when you type the caps lock key that means it is activated.
*Use of the Tab key:
- Tab key is moving cursor or mouse cursor to the next tab stop. It is very useful in several softwares to work fluently.
*Use of the Esc key:
- Esc or Escape key is used for cancelling operation, existing from full screen mode, stopping page loading, etc.
*Use of the fn key:
- It is a modifier key or function that works similar to shift key and also used as a combination of other keys to function differently. It is found in laptops and other compact layout keyboards due to size restrictions.
*Use of the Enter key:
- Enter key is used for submitting or confirming the final act. Such as, in word processors, it works for finishing the flow of action.
*Use of the Backspace key:
- Backspace key is used for deleting words or space anything backward from the left side of a content or text.
*Use of the Ins key:
- Insert key is used for correcting the overtyping of a character or text in the word processor.
*Use of the Delete key:
- Delete key is used for removing a character or selected item from the right side of the cursor.
*Use of the PgUp key:
- Page Up key is used for quickly scrolling upward through a page like web browser, documents, etc.
*Use of the PgDn key:
- Page down key is opposite of PgUp key. It is used for quickly scrolling down through a page for better navigational experience.
*Use of the Home key:
- Home key is used for dragging the cursor to the beginning of a line of a text.
*Use of the End key:
- The end key is used for moving the cursor to the end of a line.
*Use of the Arrow keys:
- Arrow keys are used for movement of the cursor one character or one line up, or down, left or right.
*Use of the Number Pad keys:
- Number pad keys are used for numerical data input or calculations of mathematical equations quickly. Generally, I used the right hand’s middle finger to type these keys for flexibility. Additionally, you can lock the number pad by typing the Number Lock which is located top of the number pad keys section which allows the alternatives of these keys.
#2: The relationship between hands and Muscle Memory:
Introduction of the fingers of both hands for typing: We will use all 10 fingers of our both (hands left and right) to learn and acquire the typing skill. First on the left hand, we have five fingers named as follows: Pinky finger, Ring, Middle, Index, Thumb and for right hand, Pinky finger, Ring, Middle, Index, Thumb. Remember, Thumb depends on your dominant hand means Righty or lefty/southpaw.
*Muscle Memory:
- Muscle memory is the process of performing a task effortlessly that develops through repetition.
- Our fingers have the nerve systems that, through them, generate signals to the brain to respond, Such as signals of hot or cold things after you touch.
- Typing is working with touch; we use our fingers to press the keyboard keys. Each time, our finger creates a signal by touching a key and transmits it to a specific part of the brain to store it. The cerebellum and basal ganglia are responsible for this process.
- The more you repeat this action of touching a key, the more signal it generates.
- At the beginning stage of typing, one requires conscious effort to maintain accuracy.
- After a countless accumulation of signals in the brain builds the intuitive or effortless system, or your action of typing becomes effortless because the brain acquires mastery through repetition that doesn’t require any conscious effort.
*Typing Speed through Touch typing:
- Touch typing means typing without looking at the keyboard. And this typing skill can be acquired through the repetition of an action many times. As a beginner, you have to imitate the pattern I gave you cautiously, then later, you must try typing without looking at the keyboard. And by the time your fingers will be adapted and internalized to the keyboard.
- Practice slowly while maintaining accuracy.
- Posture is essential for improving your typing.
- Sit in an upright position with both legs on the floor or ground,
- Lean forward your body a little bit with a straight back,
- Position both hands on the keyboard’s home row, with the bottom part of the palms resting on the table.
- First, spend 11/12 hours of practice in the initial stage of learning, like learning home row (4/hr), upper row (3/hr), bottom row (3/hr), and number row (2/hr). Then, focus on speed increase. You need 35 to 40 hours of typing practice to increase 10 WPM speed ( words-per-minute). So, the equation is 35+35+35+ 35+ 35 = 50 WPM. Additionally, several keyboard shortcuts are necessary in advanced typing, such as Ctrl+S, Ctrl+V, Ctrl+C, etc.
- Ensure your laptop screen is always at eye level so that your head doesn’t fall or bend. And the laptop stand will be the solution for you.
- Concentration and attention are the key ingredients of effective skill development. For example, muscle building requires intense attention to feel and build muscle; your concentration on each rep of your exercise will determine your muscle growth.
#3: Resources to progress:
- Websites for typing practice:
- Typing.com
- 10fastfingers.com
- Keybr.com
- Typingmaster.com
- Monkeytype.com
- TypeDesk.com
- Platforms for further learning:
- Skillshare.com
- Teachable.com
- Keyboards and Mouse recommendations:
- Logitech K270 Wireless Keyboard for Windows. ($14.78)
- Logitech M185 Wireless Mouse. ($12.10)